Showing posts with label Knitting. Show all posts

Thursday, 30 April 2015

April Round-Up

So that's another month all but over- where does the time go?
I thought this month I would give a little round up of things from the last few posts. 
The month's second post was all about my brooch collection and I mentioned at the end that I should make a display board for them all- well job done! There's even room for a quite a few more which is always good.
I also shared my last minute, have-a-go, dyeing session with a couple of balls of yarn. This is what it looks like knitting up in plain stockinette stitch, it's going to be a Springtime cowl....
My banana bread turned out to be edible and quickly disappeared at work...
Another little project I made this month, not previously mentioned, was for a gorgeous little cutie-pie who turns one on May Day. In this picture he's only 4 months old but he's showing off a baby-grow I customised for him just perfectly.
I decided upon a ball-shaped bird, made using The WI Collection yarn from Hobbycraft in a gorgeous, deep turquoise. I crocheted a ball, about 10cm in diameter, using all double crochet (British terminology, US single crochet). The yarn label suggests a 9mm hook but as I wanted it nice and tight to hold the stuffing I used a 5mm hook and could have gone even smaller with no problems.
I made 2 little wings and a tail, again using dc and 5mm hook, then sewed them on using the ends. As it's for a small child I really went to town on attaching them securely! 
For each leg- I knitted a 3 stitch i-cord (one of my favourite things to knit, it's just so satisfying) using a a pinky coloured, organic cotton yarn I had left over from another project. When it was the length I wanted, I removed the knitting needle and finished it off with a crochet hook turning each of the stitches into a picot stitch to make a little foot. I repeated the process to make the second leg and then again sewed them on very securely.
For the face I used orange embroidery cotton and a 2mm hook to make a tiny cone shape for the beak, I just made an 8 stitch ring and then crocheted dc decreases in a spiral. I embroidered on two eyes with black embroidery cotton using satin stitch.
I'm pleased with the result, I think he looks like a friendly little fellow but I especially hope the birthday boy likes him.
That's it for April! The start of May is looking good- I'm off to Outlaw Craft Fair in Bristol with my Mum on Saturday. We have a workshop booked and it will be great to spend the day together.
Until next time craft in earnest! Craftin' Ernest x

Wednesday, 25 February 2015

Molly Weasley Inspired Blanket

As I've mentioned before I'm a big fan of the Harry Potter books and films, what's not to love about them?
In the films I particularly like Ron's mother, Molly Weasley; she's big into her knitting/crochet and is a real fan of multicolour, as this photo taken from MuggleNet shows.

I'm rather jealous of her magical ability to get her needles to knit all by themselves, just another perk of being a witch I guess?!?
With Molly in mind I thought I would start a colourful project that I can pick up when I have a free moment & put down for extended periods without bother.
I decided upon a higgledy-piggledy blanket where I would just wing it with a freestyle mix of knitting & crochet!
After a couple of hours this was the result....
I really didn't worry too  much about structure and just made it up as I went along! I've used a mix of yarn types and various sizes of hooks and needles and just went with the flow.

The first section was the green and pink, crocheted in the round section and I just went on from there.
At the moment my favourite section is the mottled, green bit, crocheted with a mohair mix with a 5mm needle using treble crochets around the post front and back depending on the row. I always like the pinks and purples, moss stitch section.
I have mainly attached the pieces as I went, catching the previously yarn end and the starting end in as I went. For a few pieces I made it separately and attached it afterwards using the end and a yarn needle purely because I knitted/crocheted it on the go and didn't want to carry the rest around with me.
Where I attached a knitted section, I used a crochet hook the same size as the knitting needles to pick up stitches through the previous section before transferring the stitches to the needles, I just find this easier but you could use a knitting needle directly.
I have already wavered between liking it and then not being so keen but I plan to add to it over the next year or two and will give updates on it's progress. 

Until next time, craft in earnest! Craftin' Ernest x

Saturday, 31 January 2015

Can't Stop Knitting

Perhaps a little late in the day, with January all but over, but happy 2015 peeps!
I've been trying to have a chilled out January & just concentrate on making things for fun, experimenting a bit with no real deadline or reason. I've been making birthday presents too, thought I'd get a head start on the year. 

With the weather being rather chilly, I couldn't help but be drawn towards the big chunky balls of wool in my stash! There isn't much better on a damp and cold January evening than getting all snug in front of the TV, surrounded by huge balls of yarn that's the width of a pencil or more.
I got busy with a yummy ball of Rowan Big Wool in shade 65 "Champion" a scrumptious, burnt orange colour (one of my three go-to-colours at the moment, the other two being navy & mustard). 
I think nice, fat yarns work up lovely using a really textured knit. One ball was easily enough to make 2 cosy headbands, just the thing needed to keep your ears warm when out for wintry walks! 
For this sort of project I usually grab my box of "Harmony 101 Stitches to Knit" by Erika Knight. As the name would suggest it contains all you need to knit 101 different stitches, each one detailed on it's own, handy card, just right to slip in with your project on the go. I think it's a great addition to any knitter's library.

For one of the headbands I used the ric rac (or rickrack if you prefer) stitch, so called because (yep, you guessed it) it looks like ric rac. Here's a great YouTube video by New Stitch a Day with all the instructions needed for the stitch.
I used 7mm needles and 16 stitches, it needs to be multiples of 3 +1. Once I was happy it would comfortably fit around my head I cast off and sewed the cast-on and cast-off ends together. For an extra bit of detail I gathered the join and covered it with a small strip of stocking stitch (17 rows of 5 stitches on 5mm needles) and attached a big button in the centre of the strip. The colours of the wool and button are distorted in the picture because they're actually almost identical.
The second was made using the knot stitch or star cluster stitch (the same stitch just known by different names, I've heard a few others too but I think these are the most common- please correct me if I'm wrong). It's a really simple pattern (here's a YouTube video with instructions), more so than above, repeating every 4 rows with all right side rows being plain knit, always good. The wrong side are purl and involves knitting 3 stitches together as well as wrapping the yarn and the needle and knitting into the same stitch, nothing more complicated than that.
I used 13 stitches, this time it's multiples of 4 +1, but I used 12mm needles and although the knit is much looser the headband has a similar width to the ric rac stitch one but obviously needed a lot less rows! I decided just to sew the ends together with this one, I thought the texture was all the detail needed.
Along with the knitting, I've been "making" almost instant rings and by "making" I just meaning gluing a ring finding onto the back of something. I had a great little charity shop find- a kitschy brooch clip for 50p. I removed the back look and glued a silver plated ring finding to the back of it with E6000 glue. Now the reason I mention it was a silver plated was because after wearing it for less than an hour it broke. The glue had held tight but the plating had come away from the finding! I was left with a nice silver circle in the glue, so I filed down the the circle on the ring to the copper before re-gluing and so far it has held tight.
Buttons are always wonderful to make into rings also and the one above, on the right, from my Grandma-In-Law is a real beaut. It looks lovely and old and well-loved and as it was a shanked back button I had to snip that off
. I gave the finding a good file beforehand with this one and I used Hard-As-Nails super glue, also once it had set the following day, I gave it another layer over the top. That button isn't going anywhere (I hope I haven't just jinxed myself)!

I hope 2015 is super, wonderfully, crafty for you. Thanks so much for taking the time to read my blog, it's much appreciated.

Until next time, craft in earnest! Craftin' Ernest x

Thursday, 18 December 2014

Even More Hectic December

One week today it'll be Christmas folks, but far more importantly to me, only six days 'til THE BIG DAY- my sister's wedding!
As I mentioned in my last post it's all go and I was right that I'd be hard pressed to blog, sorry!
I'm really enjoying all the making, however I still can't share most of it. I'm almost done, just need to do the alterations to her dress, which she bought, so no pressure there! That's the task for the weekend. Then the fresh flowers for the table decorations and her bouquet but that'll be the day before/morning of job.

In between the preparation for the main event I've managed to finish a few homemade gifts although I have bought Christmas cards this year, say whhhaattt? 
I know but what can a girl do when's there's only so many hours a day and the day job takes up a lot of them?!
I did find some I liked with owls (can't go wrong) which were just right to embellish, out came the glitter glue and the ever trusted buttons and they're now just a little more special....
I also managed to fit in a trip to Cardiff's Christmas Market and picked up some lovely pressies from local makers, always good!
 http://www.cardiffchristmasmarket.com/

My "go to" present when time is ticking is the always reliable cowl....
For the first one, I used super cosy Rowan Polar yarn (60% wool, 30% alpaca, 10% acrylic) which is sadly now discontinued :-( 
I used a scrummy, purple colour and crocheted three bands approximately 7cm wide and 60cm long. I then plaited them together and joined the ends with a few more rows of triple crochet and included a couple of button holes on one end. I used lush, chunky buttons on the other end and the result is a rather snug cowl.
For the other cowl, I used James C Brett's sumptuous Monsoon yarn (70% acrylic, 30% wool) but knitted this one. I simply knitted 5cm of double moss stitch then continued in stocking stitch. The wool produced lovely bands and lent itself to being symmetrical. Again I included two button holes which were made over two rows. I then attached two vintage buttons to complete it.
Although the cowl is 65cm long and 22cm wide, one ball was plenty with quite a bit left as you can see from the picture.
Hopefully the recipients like them!

Thanks so much once again for taking the time to read my post, it means a lot.
I hope you and your family have a wonderfully festive Christmas. Be prepared for wedding overload in the New Year ;-)
Until next time, craft in earnest! Craftin' Ernest xx

Thursday, 18 September 2014

Wool, Bees & London!

Ooh I've been a little lax of late post-wise as so much has been going on!
The weekend before last was truly wonderful thanks to the fantastic City of Bristol! Although I live in South Wales I am just a hop, skip and a jump from the border with England and thus only 20 minutes from Bristol (where I actually work and got married).
Bristol is such an amazing and colourful city, it's quite small but has a lot of diversity and has a truly ethical spirit. It has it's own barter currency, it really promotes supporting "local" and has a real artsy feel about it. The famous graffiti artist, Banksy is from Bristol and there's always some impressive art project taking place, for example see my previous post about Knitted Bristol here.

Being such a great place, more often than not there's something that attracts my attention but that weekend was extra special... Bristol hosted it's first WOOL FAIR and a BEE FESTIVAL!! Whoop, whoop, two of my favourite things :-D
I volunteered for 3 hours at the Wool Fair, my duty was to stand at the entrance/exit gate collecting people's tickets and giving them a wristband. It was a lot of fun and I met some interesting people, many of whom were quick to give their opinions (most of which were positive thankfully) and saw lots of sheep and a couple of lovely alpacas. 
For the few hours of volunteering, I had free access to the event and felt totally justified spending the money I had saved on the entrance fee (and a bit more too) on woolly goodies!
Here is my lovely haul...
If I really had to choose a favourite it may be the pair of 11mm rosewood knitting needles from The Little Knitting Company. They're such a pleasure to knit with and what made me love them even more was my husband thought I'd bought myself a Harry Potter wand when he first saw one of them.

The Bee & Pollination Festival was hosted by The University of Bristol's Botanic Garden which is a wonderful venue in itself. There were lots of exhibitors, talks and demonstrations and, as it was a beautiful day, there were lots of bees and pollinators about, doing their thing, buzzzzz!


After the fun of the weekend I had my birthday to look forward to so made a week of it. I headed to London for a girly break with my sister for a few days. We shopped a lot, caught a West End show, "The Pajama Game" which we really enjoyed and it included sewing (it was set in a pyjama factory), perfect!

We returned in time for my birthday on Friday, this was spent exploring the amazing Roman ruins in Caerleon which is only 15 miles from where we live and eating lots of cake.

Then on Saturday I hot-footed it back to London for a long weekend, this time with the hubby for more sight-seeing and BBC Radio 2's Festival in a Day. 
Of course, I took some crochet with me to keep me busy between the bands.
Again we had a fantastic time and we got to see the incredible poppy art installation at The Tower of London, "Blood Swept Lands and Seas of Red". It marks the anniversary of the First World War and by the end of Autumn the Tower's dry moat will be filled with 888,246 ceramic poppies, each one representing a British or Colonial soldier killed during the war. The last poppy will put in place on Remembrance Day. Already it is a pretty incredible sight and very moving.
So all in all I've been pooped since we got home on Monday, I returned to work on Tuesday and I have only just returned to "normality"!
Thanks so much for reading, I really appreciate it.
Until next time, craft in earnest! Craftin' Ernest x


Thursday, 28 August 2014

Book Review - 100 Flowers...

Okay, well straight off, I love this book. 100 Flowers to Knit & Crochet by Lesley Stanfield (Search Press Publishers) is just lovely, right from the gorgeous cover onwards.
As it still has the receipt tucked behind the front page I know I bought this exactly a month, to the day, before I got married in 2009. For an instant it confused me why I had bought it then as I had a lot going on, for example I still hadn't started on my wedding dress (they don't call me Queen of Procrastinating for nothing)!! 
I quickly remembered it was because of the pattern for a thistle. My Dad is Scottish and was wearing full dress kilt for the wedding, even though there were fresh thistles in his buttonhole I wanted to make him something to keep. I remember him being really pleased and it is now attached to the corner of his pin-board in his computer room.
Sorry, please excuse the photograph, my Dad just text it to me as I lost the one I had taken!
Despite the name, there aren't just flowers in the book- leaves, butterflies and a few fruits are included too. 
The book is divided into 4 sections. The first being "Before You Begin" which explains how the book works and gives you the details about what you'll need along with the basics of knitting and crochet. 
This is followed by the "Directory of Flowers" which is a lovely gallery of the different finished items all arranged by complimentary colours with the number of the pattern needed next to each. 
All of these are in the next section "Technical Instructions". The first part of this contains the knitted flowers and the second has the crochet, both of which are arranged by level of difficulty. 
Having said that I don't think any of them are scarily complicated unless you've never picked up needles or a hook before. The author herself states that, "the designs are created by simple shaping rather than fancy stitches" and I quite agree. 
Unfortunately, in my opinion, there are no patterns which include both techniques which I think would be interesting. 
All the crochet patterns use British terminology but there is a section explaining the differences to American terminology on page .
I really like the way no specific wool/yarn is given nor are needle/hook sizes. Experimenting is encouraged!

So the first thing I made was the thistle of course. Then due other commitments as mentioned I didn't get a chance to make anything from it for a while.
The next time I did pick it up it helped me through quite a difficult time. My husband had to have what was considered quite a routine operation but unfortunately things didn't go to plan so he ended up spending a lot more time in hospital than expected. During this time I made quite a few different items, it was so helpful as he had to go off tests for lengths of time and rather than sitting twiddling my thumbs and worrying, I was productive and slightly distracted at least. Also because they're small items they are easy to pick up and put down or stuff quickly in your bag. 
My favourite pattern is the field poppy and I made quite a few, here's a couple of examples...
I really like to use embroidery cotton and small needles/hooks to make items to attach to cards or for more delicate accessories.
I would highly recommend this book and have just ordered another book by Lesley Stanfield- 75 Birds & Butterflies to Knit & Crochet. I'm excited about it arriving already.

All the opinions expressed are totally my own and I would to hear your thoughts about either of the books!

Until next time- craft in earnest, Craftin' Ernest x

Friday, 22 August 2014

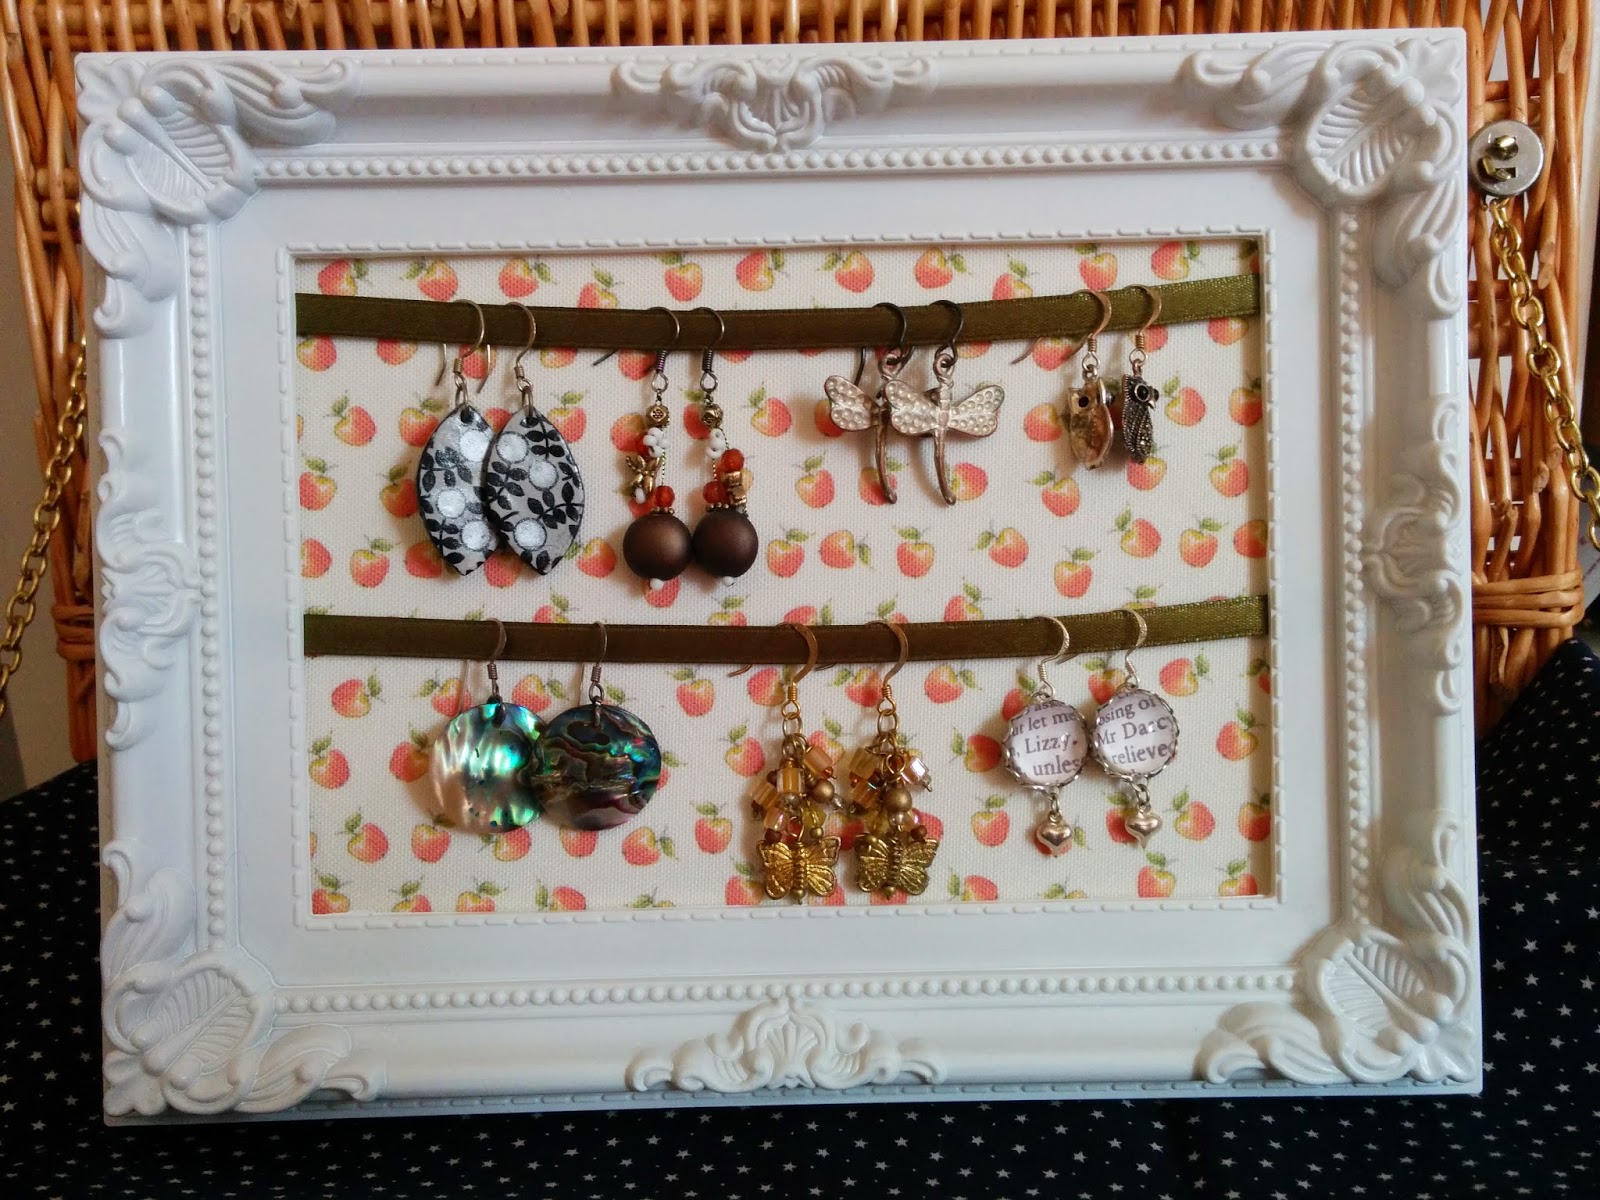
Framed Earring Stand

Hello! Summer has turned decidedly wet in South Wales and cold too. I am wearing lots of layers today :-( and I'm missing the sunshine but on the bright side, it is a great excuse to stay inside and craft!
This means I finally finished knitting the top I started a couple of months ago. I treated myself to the kit for the Juliet Tee from We Are Knitters' website and just adored the the colour and texture of the cotton yarn when it arrived, it's incredibly soft and the colour (wine) is so sumptuous. 
It was a little bit a labour of love as it included 248 rows of moss stitch- not one of the quickest stitches to knit to be fair. Also, if I'm making an item for myself it often drops to the bottom of the list as I feel guilty putting something for myself above something for others. I very much doubt that's just me?!
I also suffer from the problem that if I spend a long time on something it has to be exceptional to live up to the effort .
On the other hand the following item took almost no time at all & cost very little- an earring display stand made from a frame that I picked up in a Poundland store for the somewhat unsurprising cost of £1. However, a second-hand frame from a charity shop or vintage fair would work just as well/even better.
The glass can be discarded (by that I mean added to the pile "stuff I will find a use for at a later date". Yes it is ever growing pile with the definite possibility of taking over one day).
Cover the back section of the frame i.e. the section with the stand attached. I used adhesive backed fabric but decorative paper or regular fabric would be fine and just apply the glue to the back before applying the paper/fabric or double sided sticky tape could be used.
It's hard to see but the fabric is being stuck to a chipboard back
Then attach lengths of ribbon across the frame in the orientation you wish your frame to stand. I decided on landscape so decided on 2 lengths of ribbon. If I had chosen portrait I perhaps would have done 3 rows.
Attach the ribbon to the inner edge of the frame as shown in the photograph. Normally I would do this with a stapler but as this frame is plastic I used extra strong double sided tape. I attached the top one about half a centimetre from the top and the second about half way between the top one and the bottom edge of the frame.
Insert and the back as usual and hang your dangly earrings proudly on display!
A simple but effective way to display your earrings that looks rather pretty in my opinion.
Thanks for having a look!
Craft in earnest, Craftin' Ernest x


Friday, 30 May 2014

Briswool and Shopping

I'm just back from another jaunt to Ireland for family visiting and Hen Party Shenanigans. I went from Thursday to Sunday but had the added pleasure of a Bank Holiday Monday the following day and as I hadn't seen him for a few days the hubby was "happy to do whatever I wanted" on our bonus day off- YAY!
Top of my list was head over to Bedminster in Bristol to see "Briswool", this is an incredible (and ongoing) effort by a group of Bristol folk to recreate the whole of the city out of wool, mainly knitted or crocheted with a little nod to needle felting. To say the least it's impressive, when you first lay eyes on it you think it looks pretty neat but it's when you start to spot all the little details you really start to appreciate how wonderful it is.
I think anyone can appreciate the amount of work involved and enjoy the overall look but if you know Bristol at all you realise how amazing all the little details are.


You may recognise this street from The Antiques Roadshow
It's located in a lovely little craft shop, The Paper Village- http://www.radisol.co.uk/paper-village/, at the moment so can't be displayed in it's full glory until they find somewhere to exhibit it properly and like any real city it's still growing and transforming. We chose the perfect day to visit as it was quiet, I think a lot of people may have thought it would be closed for the Bank Holiday. The very friendly owner, Vicky, was super enthusiastic and told us they had had a couple of days where there were queues stretching down the street and she couldn't actually sell anything due to the volume of people in the shop. Thankfully I was able to purchase a few items, well it seemed only right to support the shop after it made such an effort (any excuse huh?)
We then went for a wander and stumbled across another lovely shop selling lots of handmade items created by local artists- Dadswell Glass, full of lovely stuff and I was delighted to pick up a couple of treats for up-coming birthdays http://www.dadswellglass.co.uk/category/shop/
We then headed to the city centre to one of my favourite shops in Bristol, Made in Bristol. http://madeinbristol.blogspot.co.uk
As soon as I step in I'm always in awe, I walk around and everything I see makes me think "I want, I want, I want"! When we saw Alice Shields' ceramics we couldn't resist, I treated the hubby to an slightly early anniversary present and he did the same for me. We're both suckers for bumblebees...
Always good to support local makers. Craft in earnest, Craftin' Ernest x