Monday, 13 October 2014

Wrapping Paper

I love wrapping presents, so much so I'd do it as a job if I could.
Having said that I can feel rather guilty about the frivolous nature of wrapping gifts with paper and the cost to the planet. I always try to unwrap things carefully so I can reuse the paper for something, be it to wrap something else or to make a card or line something, whatever it is it's good to reuse and is cost-effective too- a nice bonus! There are some really gorgeous papers out there that are such good quality they can be used over and over, especially if tied with ribbon instead of using sticky tape.

I'm always on the look out for for things to use as wrapping paper or to make gifts bags etc.
With this philosophy in mind I rescued some paper from work recently after the photocopier had a "software malfunction" and printed out a document as a series of lines similar to a barcode. Most had an overall green appearance due to the stripes being blue, yellow and black and some were just black and white.

I immediately thought the green tone paper would make great Christmas wrapping and the black and white could be easily jazzed up.

I made a gift bag using one sheet of the green, just the right size to pop a few small Christmas presents before finishing it off with a festive bow. I used a box of tea as the base structure (see below) and began wrapping as per normal at one end but without sticking anything down. I then drew a flap template at the other end which I cut out with scissors. I stuck the edge and the folded end together with double sided sticky tape and attached a strip along the edge of the flap, ready for sealing.

Using this wonderful origami tutorial from the delightful Gathering Beauty, I used two, green sheets to make a box. I finished it off with red and white striped washi tape along with a gift bow made with the same tape and plain paper off-cuts. It's just right for a Christmas present of jewellery. 

I used a pink and a yellow highlighter to spruce up a sheet of black and white, I thought this was "bang on trend" ;-) as neon is everywhere at the moment and would be good for my friend's birthday as she likes bright colours. It looks great with black ribbon
Making your own stamps as in this post is a great way to personalise plain paper into something a little more special and could even make newspaper a possible source?!
The other black and white sheet was calling out for haphazardly stamped, hot pink bumblebees and to be made into a gift bag.
I covered it with transparent, sticky vinyl then I used the same technique as the Christmas bag, although, this time, I stuck the edge and flaps down as I went.
I then folded the top 2cm down all the way around and cut 2 holes in both of the wide sides approximately 1cm down. I threaded a piece of ribbon (liberated from inside a cardigan) through each side to create handles and used a bead on each end before knotting for extra security. I also popped a rectangle of card in the bottom for a bit of extra strength.
When that's all done you're left with with a lovely little gift which is durable enough to be used over and over!

I hope you like the results? Thanks so much for visiting my blog.
Until next time- craft in earnest, Craftin' Ernest x

Tuesday, 30 September 2014

Learning to Crochet & Finishing a Long Forgotten Jumper

I realised over the weekend I learnt to crochet just over eight years ago now!
I used the book, "Good Housekeeping Crochet" which I had bought in a charity shop. It is still available second-hand from Amazon here and I've just noticed it's almost the same age as me (first published in 1981). I think it's great (as do both people who gave it 5* reviews on Amazon) and still regularly refer to it if I'm looking for a stitch. It doesn't contain patterns for items, it's more a directory of stitches and gives examples of things each stitch may be good for and suggested yarn, etc.

The first book I bought which contained patterns for finished items, just after I had mastered the basics, was "Chicks with Sticks Guide to Crochet" by Nancy Queen & Mary Ellen O'Connell. I bought it whilst in Ireland for my Grandma's 80th birthday party, she would have turned 88 last weekend so I know it's been eight years.
This book also has a good "how-to" section and discusses different yarn types etc. However, it is an American book and as such uses American terminology which I had to get my head around as I had only just got the hang of British terms.
I'm not a fan of every item in the book but there were a few items I really liked and it seemed like a good choice for a beginner especially from the options available in the general book shop I was in.
My favourite pattern is easily the shell stitch hat, Surfer Chick Quick Cap, on page 109. 
I have made this hat I don't know how many times, most female members of my family have received one at some point! I've made them in lots of sizes by changing the wool and hook size, right from newborn upwards. I also quite often add a accent such as a crocheted flower or a button. I also tend to make it a bit longer and not quite so tight as the one pictured in the book.
There's no scale in this picture but it's for a newborn and the yarn was a super soft mix.
The first item of clothing crochet item I attempted was the "No Sweat Hoodie" on page 91. This was just after the first hat I made. As I had found that nice and easy, I was buzzing with confidence. 
Unfortunately I never actually finished the hoodie though, I made all the sections but when it came to sewing it together I couldn't get it to work. So I folded it up, but it in a storage box and promptly forgot all about it. 
I decided now was the time to rescue the sections from the depths of my storage mountain and see if it's clear to me now that I have a good bit of experience behind me and I have to say I must have been a complete moron back then!!
I honestly don't know what was wrong with me but I can't have been thinking straight. The hoodie features raglan sleeves- I know full well what raglan sleeves are and did so long before I could crochet, so I don't know what my excuse is for completely missing an entire section of the pattern; this resulted in both my sleeves ending with straight tops without raglan shaping at all?!? 
Before
Like I said, moron. I'm going to put it down to the fact I was very inexperienced at reading patterns. Suffice to say it would be impossible to finish it as it was. Thankfully I've come a long way since then so decided to finish the jumper.
I looked up to see if there were any discussions online and found some comments on Ravelry. That made me feel a whole lot better as other people were struggling with the back and I managed that at least. Although, looking at the pencil notes I made all over the place I don't think I found it super straight forward.
I finished the arms to a nice raglan point (yay!) 
After- raglan style!
I sewed the front, back and arms together and tried it on. It was okay but not great, a big short and tighter than I would have liked. To be honest the yarn I chose may have been a factor but it is the correct weight suggested and after doing a tension square I used a 12mm hook instead of 11.5mm to obtain the gauge needed. I loosely attached the hood and decided against it altogether, it didn't look right at all only coming up to the top of my head. 
So to increase the length, I decided to add a waist band using three rows of half treble stitches (US= half double stitches) and a row of double stitches (US = single stitch). 
Once I had done this I decided to make it a polo neck jumper with 4 rows of half trebles and a row of doubles to match the bottom and I completely disposed of the hood altogether. 
(If the sleeves hadn't been plenty long enough as they were, I would have added wristbands to match also.)
That's the great thing about a bit of experience, it gives you the confidence to change the pattern up a bit and even make your own patterns. In many ways I actually prefer to make it up as I go along now rather than reading a pattern but you do have to allow for trial and error!

I used Patons' "Eco Wool Chunky" to make the jumper and while it is really nice to crochet with and the result is lovely and snuggly, I'm not very keen on the colours. I think my taste must have changed since then, although it looks better as a ball. It is ecological though and knowing me it was probably on offer? ;-)

What do you think? Thanks so much for reading this post!

Until next time craft in earnest, Craftin' Ernest x

Thursday, 18 September 2014

Wool, Bees & London!

Ooh I've been a little lax of late post-wise as so much has been going on!
The weekend before last was truly wonderful thanks to the fantastic City of Bristol! Although I live in South Wales I am just a hop, skip and a jump from the border with England and thus only 20 minutes from Bristol (where I actually work and got married).
Bristol is such an amazing and colourful city, it's quite small but has a lot of diversity and has a truly ethical spirit. It has it's own barter currency, it really promotes supporting "local" and has a real artsy feel about it. The famous graffiti artist, Banksy is from Bristol and there's always some impressive art project taking place, for example see my previous post about Knitted Bristol here.

Being such a great place, more often than not there's something that attracts my attention but that weekend was extra special... Bristol hosted it's first WOOL FAIR and a BEE FESTIVAL!! Whoop, whoop, two of my favourite things :-D
I volunteered for 3 hours at the Wool Fair, my duty was to stand at the entrance/exit gate collecting people's tickets and giving them a wristband. It was a lot of fun and I met some interesting people, many of whom were quick to give their opinions (most of which were positive thankfully) and saw lots of sheep and a couple of lovely alpacas. 
For the few hours of volunteering, I had free access to the event and felt totally justified spending the money I had saved on the entrance fee (and a bit more too) on woolly goodies!
Here is my lovely haul...
If I really had to choose a favourite it may be the pair of 11mm rosewood knitting needles from The Little Knitting Company. They're such a pleasure to knit with and what made me love them even more was my husband thought I'd bought myself a Harry Potter wand when he first saw one of them.

The Bee & Pollination Festival was hosted by The University of Bristol's Botanic Garden which is a wonderful venue in itself. There were lots of exhibitors, talks and demonstrations and, as it was a beautiful day, there were lots of bees and pollinators about, doing their thing, buzzzzz!


After the fun of the weekend I had my birthday to look forward to so made a week of it. I headed to London for a girly break with my sister for a few days. We shopped a lot, caught a West End show, "The Pajama Game" which we really enjoyed and it included sewing (it was set in a pyjama factory), perfect!

We returned in time for my birthday on Friday, this was spent exploring the amazing Roman ruins in Caerleon which is only 15 miles from where we live and eating lots of cake.

Then on Saturday I hot-footed it back to London for a long weekend, this time with the hubby for more sight-seeing and BBC Radio 2's Festival in a Day. 
Of course, I took some crochet with me to keep me busy between the bands.
Again we had a fantastic time and we got to see the incredible poppy art installation at The Tower of London, "Blood Swept Lands and Seas of Red". It marks the anniversary of the First World War and by the end of Autumn the Tower's dry moat will be filled with 888,246 ceramic poppies, each one representing a British or Colonial soldier killed during the war. The last poppy will put in place on Remembrance Day. Already it is a pretty incredible sight and very moving.
So all in all I've been pooped since we got home on Monday, I returned to work on Tuesday and I have only just returned to "normality"!
Thanks so much for reading, I really appreciate it.
Until next time, craft in earnest! Craftin' Ernest x


Tuesday, 2 September 2014

Crochet Ringed Necklace Tutorial

I can't believe it's September already, time is just flying by! However, as it's my favourite month I don't mind too much. Whilst the weather has actually taken a change for the better with the Sun shining brightly, the colours of the leaves have started to change and Autumn is certainly on it's way. Before I get cracking on the big woolly scarves and hats I thought I would make something a little more delicate....
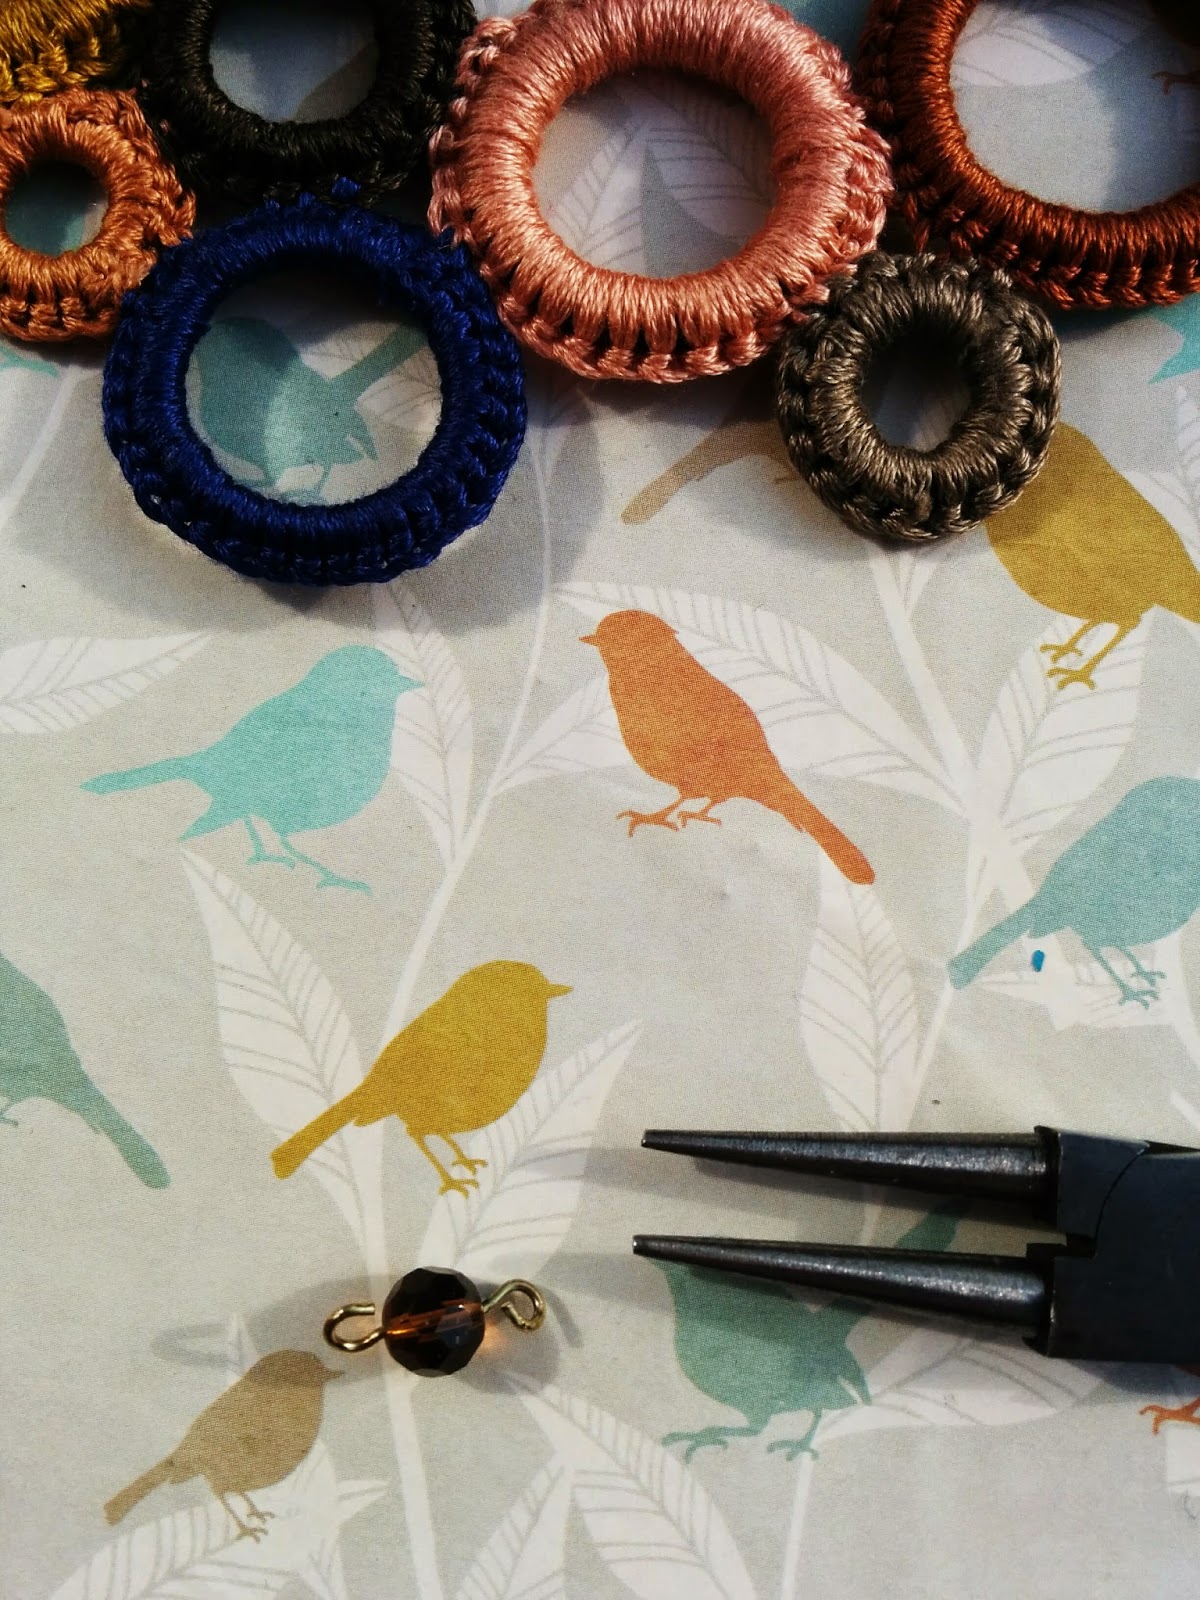
I've seen necklaces similar to this a few places and really like them. So when I stumbled across an assorted pack of rubber o-rings for 99p in the hardware section of my local Wilkinson's the other day, I immediately knew they'd be just the thing I needed to make my necklace. As they vary in diameter and thickness I thought they'd provide the perfect, varied base rings and they are flexible but hold their shape, also they weigh next to nothing so the necklace would be nice and light.
I'm afraid I didn't take the picture until after I'd opened and removed the o-rings I was going to use- sorry dopey me!
What you need:
O-rings (or similar for you base- you might find something you prefer/better)
Embroidery cotton or fine yarn
Small crochet hook
Sewing needle
Scissors
Chain, jump-rings and fastening e.g. lobster clasp
Pliers
A couple of beads are optional but do make a nice addition in which case a small amount of coordinating wire is also needed, together with round-nose pliers and wire-cutters.


I decided to use 7 of the rings (I always think odd numbers work best for this sort of thing) so I chose the same number of different embroidery cottons to use. I picked 7 colours I liked the look of together and that I thought would go with a range of my clothes. My favourite colour to wear is navy so that was my starting colour and I went from there. Alternatively you could use just one colour or different shades of the same colour might give a nice finish too?

Once I had decided on the colours I arranged the o-rings to a rough layout I liked and started to crochet.
Throughout I used double crochet (dc) with a 2.5mm hook and treated the o-rings as a chain ring and crocheted into the "chain space". Obviously the number of stitches required varied depending on the size of the o-ring but I kept pushing the stitches tightly together to make sure you couldn't see any of the black rubber. 
Once I had completely finished the round and was happy there was no gaps I joined the last dc to the first dc with a slip stitch.
At the end of the round I left a long tail of cotton on each ring to use to sew the rings together. 
I did this by sewing a few crochet stitches from two rings together with the tail from one then pulling the thread through a few of the hoops around the ring and cutting off the excess.
I repeated this step with each ring being sure to keep the arrangement of the rings on the design I decided up. The tail of the final ring isn't needed so I sewed this into the hoops of the ring as previously and again cut the excess.
Once all the rings are sew securely together you just need to add the chain. This can be done by attaching a jump ring to the upper, outer edge of the two end rings, going though the top of a single crochet stitch and the end of the chain (see * below as with the beaded step). Then attach the clasp to the other ends of the chain also using jump rings.
If you decide to add beads, thread one onto wire and create a loop either side of the bead with the round-nose pliers. 
Attach one of the loops to the crochet stitch on the ring as with the jump ring and the other loop to the chain. Finish as before.
*If using a jump ring insert as above and attach the chain directly
All done! I'd love to know if you make one yourself. 
Thanks so much for taking the time to read my blog, I really appreciate it!
Until next time craft in earnest, Craftin' Ernest x

Thursday, 28 August 2014

Book Review - 100 Flowers...

Okay, well straight off, I love this book. 100 Flowers to Knit & Crochet by Lesley Stanfield (Search Press Publishers) is just lovely, right from the gorgeous cover onwards.
As it still has the receipt tucked behind the front page I know I bought this exactly a month, to the day, before I got married in 2009. For an instant it confused me why I had bought it then as I had a lot going on, for example I still hadn't started on my wedding dress (they don't call me Queen of Procrastinating for nothing)!! 
I quickly remembered it was because of the pattern for a thistle. My Dad is Scottish and was wearing full dress kilt for the wedding, even though there were fresh thistles in his buttonhole I wanted to make him something to keep. I remember him being really pleased and it is now attached to the corner of his pin-board in his computer room.
Sorry, please excuse the photograph, my Dad just text it to me as I lost the one I had taken!
Despite the name, there aren't just flowers in the book- leaves, butterflies and a few fruits are included too. 
The book is divided into 4 sections. The first being "Before You Begin" which explains how the book works and gives you the details about what you'll need along with the basics of knitting and crochet. 
This is followed by the "Directory of Flowers" which is a lovely gallery of the different finished items all arranged by complimentary colours with the number of the pattern needed next to each. 
All of these are in the next section "Technical Instructions". The first part of this contains the knitted flowers and the second has the crochet, both of which are arranged by level of difficulty. 
Having said that I don't think any of them are scarily complicated unless you've never picked up needles or a hook before. The author herself states that, "the designs are created by simple shaping rather than fancy stitches" and I quite agree. 
Unfortunately, in my opinion, there are no patterns which include both techniques which I think would be interesting. 
All the crochet patterns use British terminology but there is a section explaining the differences to American terminology on page .
I really like the way no specific wool/yarn is given nor are needle/hook sizes. Experimenting is encouraged!

So the first thing I made was the thistle of course. Then due other commitments as mentioned I didn't get a chance to make anything from it for a while.
The next time I did pick it up it helped me through quite a difficult time. My husband had to have what was considered quite a routine operation but unfortunately things didn't go to plan so he ended up spending a lot more time in hospital than expected. During this time I made quite a few different items, it was so helpful as he had to go off tests for lengths of time and rather than sitting twiddling my thumbs and worrying, I was productive and slightly distracted at least. Also because they're small items they are easy to pick up and put down or stuff quickly in your bag. 
My favourite pattern is the field poppy and I made quite a few, here's a couple of examples...
I really like to use embroidery cotton and small needles/hooks to make items to attach to cards or for more delicate accessories.
I would highly recommend this book and have just ordered another book by Lesley Stanfield- 75 Birds & Butterflies to Knit & Crochet. I'm excited about it arriving already.

All the opinions expressed are totally my own and I would to hear your thoughts about either of the books!

Until next time- craft in earnest, Craftin' Ernest x

Friday, 22 August 2014

Framed Earring Stand

Hello! Summer has turned decidedly wet in South Wales and cold too. I am wearing lots of layers today :-( and I'm missing the sunshine but on the bright side, it is a great excuse to stay inside and craft!
This means I finally finished knitting the top I started a couple of months ago. I treated myself to the kit for the Juliet Tee from We Are Knitters' website and just adored the the colour and texture of the cotton yarn when it arrived, it's incredibly soft and the colour (wine) is so sumptuous. 
It was a little bit a labour of love as it included 248 rows of moss stitch- not one of the quickest stitches to knit to be fair. Also, if I'm making an item for myself it often drops to the bottom of the list as I feel guilty putting something for myself above something for others. I very much doubt that's just me?!
I also suffer from the problem that if I spend a long time on something it has to be exceptional to live up to the effort .
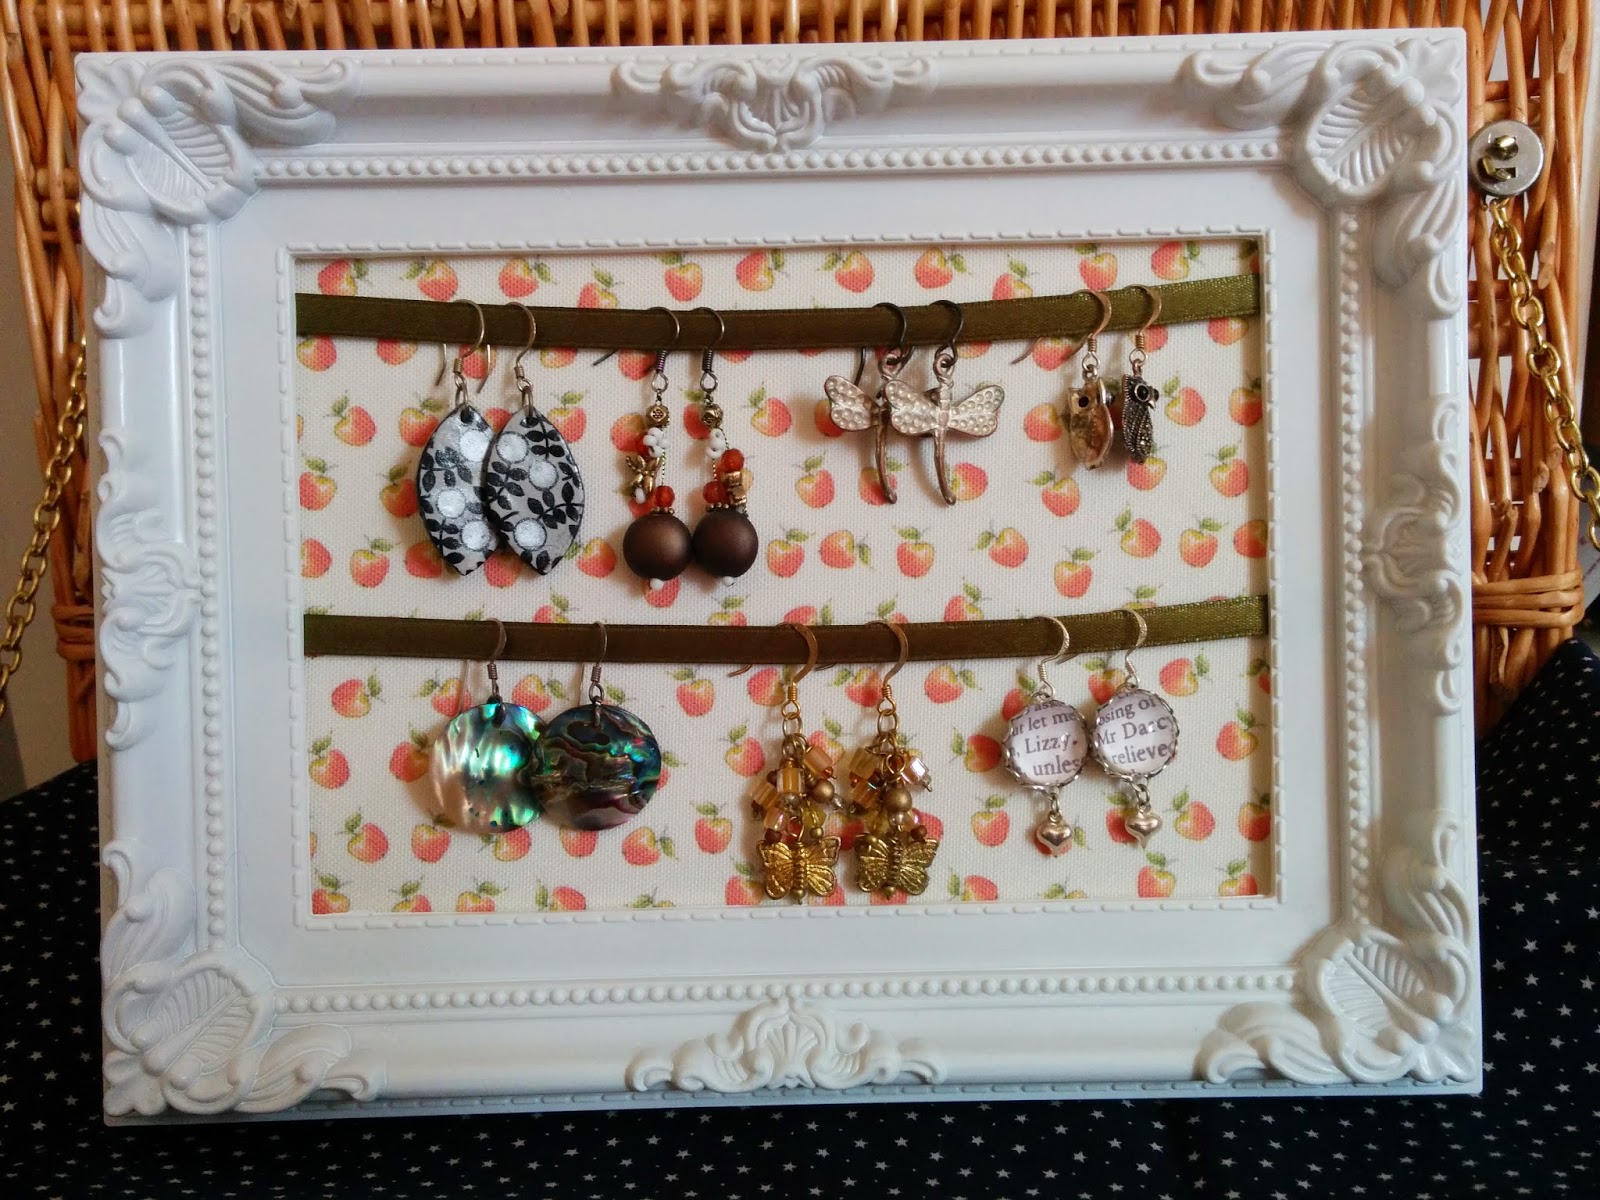
On the other hand the following item took almost no time at all & cost very little- an earring display stand made from a frame that I picked up in a Poundland store for the somewhat unsurprising cost of £1. However, a second-hand frame from a charity shop or vintage fair would work just as well/even better.
The glass can be discarded (by that I mean added to the pile "stuff I will find a use for at a later date". Yes it is ever growing pile with the definite possibility of taking over one day).
Cover the back section of the frame i.e. the section with the stand attached. I used adhesive backed fabric but decorative paper or regular fabric would be fine and just apply the glue to the back before applying the paper/fabric or double sided sticky tape could be used.
It's hard to see but the fabric is being stuck to a chipboard back
Then attach lengths of ribbon across the frame in the orientation you wish your frame to stand. I decided on landscape so decided on 2 lengths of ribbon. If I had chosen portrait I perhaps would have done 3 rows.
Attach the ribbon to the inner edge of the frame as shown in the photograph. Normally I would do this with a stapler but as this frame is plastic I used extra strong double sided tape. I attached the top one about half a centimetre from the top and the second about half way between the top one and the bottom edge of the frame.
Insert and the back as usual and hang your dangly earrings proudly on display!
A simple but effective way to display your earrings that looks rather pretty in my opinion.
Thanks for having a look!
Craft in earnest, Craftin' Ernest x


Thursday, 7 August 2014

Embroidered Button Earrings

Although it's now Thursday (where do the weeks keep going). I had an amazing weekend mainly because my bestie/sister returned from a two week holiday on Sunday so we had a catch-up shopping trip/smoothie drinking session. I also had a lovely coffee morning with old friends, bliss. The other reason was due to me having a major button bargain on Saturday morning- I bought 4kg of buttons for £3!! That meant five hours of blissful sorting on Saturday afternoon (I should have been finishing a knitting project but that's a different story).

Amongst my treasure trove there were a lot of fabric covered, shank- backed buttons and most of which were in pairs. This gave me the inspiration to make some into earrings. By gluing an earring finding to the back of each the jobs a good'un in about 60 seconds flat but I wanted something individual so decided to embroider a simple design on each using embroidery cotton and satin stitch.
To make them you need:
A pair of fabric buttons
Embroidery cotton
Sewing needle
A pair of earring posts with backs
Scissors
Glue
Piece of paper (at least as big as the buttons)
Pen

Make a stencil by drawing around one of the buttons then draw and cut out your chosen design. I went for a simple heart so folded the paper in half to cut the heart.

Using the stencil draw the design onto the button. I used a pen whose ink would be visible but not startling obvious so was not the easiest to pick up on the photograph.

Split 2 strands of the cotton and thread onto your needle, with the needle in the middle giving your cotton 4 strands of thickness. Sew the first stitch from the centre of the heart down to the tip at the bottom, do not completely draw the thread through but leave a millimetre or so protruding- this will be hidden under the satin stitch and means there is no need for an unsightly knot.

Following the outline and using satin stitch (http://www.wikihow.com/Satin-Stitch) "fill in" your design.

Once the design is complete, sew a long stitch under the design and cut the cotton. Repeat the process for the second button.
Glue and earring post to the back of each. The buttons I chose had a piece of material as the method for sewing them onto something. I cut this way in order to glue the posts to a more secure surface. If your button has a shank snap this off.
Once the glue has dried completely, you're all done!
I now plan to make a pair in every colour.
Until next time craft in earnest, Craftin' Ernest x