Monday, 25 March 2013

Keep Your Off-cuts

Hi there,
It's been another busy week and electronic gadgets have turned against even more than usual! Thankfully it amuses the hubby but he’s got to get fed up of the constant cry for help at some point? (Update- this post actually went ga-ga after first posting. My apologies, as I said computers are not my thing. I hope I’ve rectified it now.)
I have had a few orders to make this week and I have, also, started things but not had the time to finish them yet. An important example is the Easter Wreath for my Mum, thankfully she’s not expecting so I've given myself until Friday to finish and if I get it done beforehand it's a bonus (but looking unlikely).
I have made booties for a baby boy this time. He’s a bit older at 9 months so they had to be bigger. I didn't have the same frustrations of last time- thank goodness. Mistakes are there to teach us and I learnt that lesson ;-)
I have been making different brooches including a specially commissioned, crocheted one to go with a wedding outfit. Fingers crossed it meets the mark. As usual I forgot to take a finished photo but here’s a pic of the flowers before they were sewn together and black beads and diamantes were sewn in the centres.
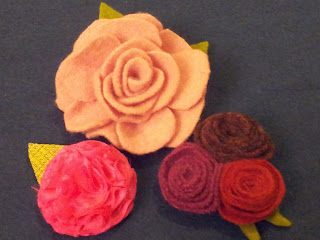
 I’ve been making different felt and material flowers such as these….
It occurred to me I could use the off-cuts for the baby boy booties to make a flower. The two fabrics fused together make it an ideal stiffness for the flower. I was quite pleased with the results and think it will look nice on a navy blazer for the Springtime, if the Spring weather ever arrives?
 I will feature a tutorial to make your own flower brooch in a future post very soon.
Remember to Craft in Earnest! 

Monday, 18 March 2013

Salt Prints with a Vintage Twist


Last year I took part in a great, day long workshop at Bristol’s Folk House making salt prints. 
The Bristol Folk House is a charity run, adult education centre which run a variety of classes from Arts & Crafts to Fitness and Personal Development. It also has a really gorgeous café which makes amazing Spanish omelette and little dark chocolate, truffle bites- simple delectable! http://www.bristolfolkhouse.co.uk
The salt printing is a process for making “photographs” using common table salt and silver nitrate. The resulting prints have a lovely, old fashioned brown hue and a vintage quality.


The process was quite simple and as it was a sunny day we used sunlight to develop some of our prints but a dark room and the paraphernalia that goes with it is also essential. We also used UV bulbs and as I have a pet tortoise we have those at home so I had every intention of doing more at home but as is so often the case even with best intentions…

Here is a link to a website I found with great instructions on salt printing which includes a few examples:
For some time I have wondered what to do with the prints, I also had some box frames (bought in The Range) hanging round the house. I decided to grab my box of trinkets, some lace and the obligatory buttons and put it all together. Layering things up as I thought went with the prints. Some of the lace, whilst actually old, was still quite white so I “aged” it by soaking it in some hot water with a teabag. Some of the buttons had shanks so I removed them with a pair of mini wire cutters. I stuck everything together with either double sided, sticky tape or contact adhesive.
The frames were just plain, untreated pine. I stained one with a single coat of dark oak, wood stain. I painted the other larger one with regular emulsion in “Brandy Cream”. I then scribbled all over it with a dark brown, oil pastel, rubbed that all in with a piece of cloth then sanded it down with some fine sandpaper.
I’m quite pleased with how they turned out. I think if you fancied doing something similar you could always use a nice wrapping paper instead of salt prints- there are lovely vintage ones available!


Thanks for reading! Always Craft in Earnest !-)

Thursday, 14 March 2013

Kumihimo Box

Hey there, I mentioned in a previous post how great my Dad is and that we went to a craft group together. Well, he went and proved me totally correct! For the last few weeks he has secretly been making me a gift, and he didn't even know there was no need as I had been singing his praises anyway.
A few years ago, the two of us did an evening course in antique restoration. We had to buy something to restore so headed to a local collectables and antique shop. I bought a small oak table for £10 which turned out really well in my opinion, much better than I had expected. My Mum loved it so it's now in my parent's hallway. Unfortunately, I didn't take before pictures but I'll have to get a picture of it looks now to post. My Dad bought a battered wooden box with broken hinges and was completely stripped bare on the inside (sorry, again no before picture). We thought maybe it once was a cutterly box but don't know for sure. Over the six week course we scrapped them and scrubbed with wire wool before pain stakingly polishing our items. I hadn't really thought about his box since we finshed. That was until the other night when I received a picture text of the closed box asking if I remembered it...
I sure did. Doesn't it look lovely and shiny!
Another part of the back story is that in September my Mum and I went on a day long, craft tour in Somerset. It involved craft centres and private homes opening their doors to people and demonstrating different crafts and showing off their work. We had a lovely time and I discovered Kumihimo weaving and we thought my Dad would probably like it too. So I bought the two of us Beadsmith Kumihimo Disks and on the way home Mum and I called into Hobbycraft for some satin cord. It turns out he did love it and said it gave him an idea but wouldn't say what.
So we've been busy Kumihimo weaving away, I discovered the joy of adding beads- always a good addition in my opinion. Here's a picture of my first necklace using beads whilst Kumihimoing- may have just made-up a new adjective?
So after the first picture message my Dad then sent me a picture of the inside of the box which he had kitted out especially, remember it was just plain, rough wood....
How amazing is that? He's so clever. He's idea had been to turn the box into a great storage place for all the bits needed. The space in the lid on the right is for the round disk but I have a necklace on the go at the moment. It's fully lined with black velvet and I just love it. I'm so grateful he went to the effort- Thanks Dad! (He doesn't read this but he may in the future.)

I'll feature Kumihimo in a blog in the next few weeks. It's such a simple craft to pick up and doesn't cost much at all but ou can get great results from it.
Also, I don't know if they're very clear in the photograph but the front compartment contains some vintage, coloured linen thread, I bought at the Bristol Vintage Fair on Saturday. I'm looking forward to using them!

Until next time,  craft in earnest! x


Monday, 11 March 2013

Baby Booties


It’s been a busy week and I’m guilty of burning the candles at both ends. Naughty me!
Saturday was spent shopping for a bridesmaid’s dress with my wonderful friend Becky. Her wedding is in February so it’s full preparation mode now. We had a great day and have more planned.
We also called into Bristol’s Vintage Fair, well it would be rude not to, and a purchase or two-ish was made ;-)

I haven’t made much this week as I was busy, busy, busy but I did manage to make a pair of baby booties. 

Unfortunately they weren't smooth sailing. This was mainly due to not thinking my materials through thoroughly and that led to a major mishap. I bought a lovely, fleecy blanket in Ikea for the fabric. It’s purple on one side, fuchsia on the other and is really soft and snuggly. I thought I would use this to line the boots with the purple side facing out. As the outer fabric is cotton I decided it would be best to bond the fabrics together before sewing. In doing this, the heat from the iron caused the purple and fuchsia sides to separate, something I really should have taken into consideration. This resulted in the fleecy side of the fuchsia being bonded to the outer cotton, leaving a shiny side exposed. Not good! To overcome this I had to separate more of the blanket fabric and had to cut all the pattern pieces out again from just the fuchsia side. I didn’t bond this to the already bonded cotton and fleece, I just pinned it and sewed the sections together whilst completing each boot. Obviously, If I had chosen a single layer fleece or separated them first, I would have saved time and effort.

I have put together a tutorial for the booties if you fancy making a pair yourself. I have done it as if I hadn’t messed up, so let’s just pretend I didn’t, yeah? I designed the pieces using the measurements of an average newborn weighing 7lb 8oz, that is approximately 7.5cm long by 2.5cm wide.

Continue reading for the tutorial!

Sunday, 3 March 2013

A Day With My Dad

I spent yesterday with my Dad at "A Time To Knot", a macramé group (though there was knitting and kumihimo braiding going on too) who meet once a month in Cardiff Bay set up by Suzen Millidot, author of numerous macramé books. We had a really great day and the group were extremely friendly and welcoming. My Dad is the first man to attend the group and the rest of the ladies were really impressed that he'd spend the day with me at a craft group. I told them he was as keen as I was to go. He went even further into their good books by spending the day making my Mum a necklace to wear in the evening as they were going out for a meal. I guess as he's always been the same and for me it's "the norm" so I found it amusing that they raved about him when he left the room. I know I'm bias but it's true, he is great! My Mum loved her necklace which was an extra nice treat as she starting to feel unwell and my Mum is almost never ill. Today she sounds like a Barry White impersonator and aches all over but she has her necklace to cheer her up.
I spent the day experimenting with different techniques and started various items but never actually finished any of them such as this watch strap, the other half is yet to do.


I bought another of Suzen's books, "Mirco Macramé Jewellery" part of the "Twenty to Make" series, which contained the watch strap project. It's great for beginners like me as all the projects use varieties of the lark's head knot and the square knot. I just kept getting distracted by chatting and watching others. I do want to complete a grocery bag at some point but it may be a while before you see pictures of that.
The group meets in the conference room of the wonderful "Craft in the Bay", a co-operative gallery own by and run by "The Makers Guild in Wales". It was worth the trip alone to see the beautiful, handcrafted items on display and for sale. There is a lot of talent in Wales, you should definitely take a look: http://www.makersguildinwales.org.uk
There's also a really good cafe with a huge choice of cakes and delicious, healthy food called Kemi's, it was the cherry on the top of a wonderful day.
I also mentioned baby items in the last post but as almost broke my neck getting up this morning due to the build up of books, magazines and other paraphenalia on the floor by my side of the bed, I had to finally tidy it all up! Whilst I was at it I sorted the stuff under the bed too, I'm a glutton for punishment. It was not a quick job thanks to my inability to get rid of anything, therefore I have only had time to finish one item so far, a crocheted hat.


This is a slighted adapted version of a hat featured in the book, "The Chicks with Sticks' Guide to Crochet" (http://www.amazon.co.uk/Chicks-Sticks-Guide-Crochet-The/dp/082300676X/ref=sr_1_1?ie=UTF8&qid=1362345137&sr=8-1) I also embellished it with a simple, little flower and, of course, a button.
I really like this book. Funnily enough my Dad bought it for me after I had just learnt to crochet, but as it uses American terms and I hadn't long learnt the British wording I had to be extra careful at first as I kept mixing the stitches up.
I will feature the other items in the midweek post along with a tutorial. Until then keep crafting in earnest! x