Sunday 31 May 2015

A Board Book Duck Brooch Tutorial

I mentioned in a previous post about my day trip to Wells that I had bought a few things for future craft projects and that I would share the details with later. This is the first of one of those posts...

I picked up a child's board book for a bargain price of 40 pence called "I Went Walking". It's written by Sue Machin and has lovely illustrations by Julie Vivas. 
What caught my eye was the duck on the front. My mum loves ducks, so much so my parent's house is named "Teach na Lacha" which is Irish for "House of Ducks" and is full of duck items- they're on cushions and curtains and she has lots of ornaments (no actual ducks though as they don't have the room and "it would be too messy").
I really liked the duck illustration and thought I could make something for my mum with it. Happily the duck features on most pages and I decided to make a brooch with one of them.
It turned out to be quite simple project and really any board book could be used if you want to give it a go.

You will need:
  1. First cut out the image with the craft knife. I found this can take a while as you need to go over the cuts a few times to go right through but be patient, you'll get there.
  2. "Glaze" the image using the embossing powder- press the image face down onto the colourless stamping pad, cover with embossing powder, tip off excess and heat until all the powder has transformed. (Even though I was using extra thick embossing powder I decided to give it two coats by repeating the same process, this resulted in a wavy surface. I didn't mind that but wouldn't do it next time).
  3. Place image face up on reinforcement layer and draw around the edge as closely as possible then cut out with craft knife.
  4. Glue to the back of the glazed image, spreading the glue as close to the edge as possible without lots seeping out, and leave to fully dry.
  5. Glue a brooch finding to the back and again leave to cure.
  6. Draw around the edge of the brooch slightly going over the edge on the front and back to give a silver rim effect.
  7. You're all done, wear with pride!
    Happily my mum loved it and that makes me a happy bunny. I'll certainly be looking out for other board books to convert when in charity shops.
I'd love to know your opinion or if you give it a go. Thanks for reading.
Until next time, craft in earnest! Craftin' Ernest x

Thursday 21 May 2015

Dandelion Clock

My last post described how I upcycled an old clock (minus the mechanism) into a box frame complete with Summer scene and stamped "quote". 
I said I was pleased with the result which was good as I had another 2 clocks ready for the same treatment, well I figured there's no time like the present so I cracked on with the second one. 
I ran with the Summer theme again but also referenced the former use...
I chose " There's no tick tock with a dandelion clock" and followed the same process as last time (here). I have no idea why but with this one the stamped letters didn't blur even though I did exactly the same thing. Crafting can be like that, huh?
For the head of the dandelion I drew and filled in a circle with a brown fabric pen. Using my sewing machine I sewed lines radiating out from the circle. I then sewed a spiral over the lines with a decorative stitch that looks like connecting asterisks *******
This caused the fabric to pucker slightly so I cut it out and attached it to a new background with Heat n Bond. I added the wind blown seeds by hand, using the brown fabric pen for the bottom and then hand sewed the top, again an asterisk shape on top of a slightly longer double stitch connected to the brown dash. As with the previous picture I added a bee buzzing around because it just wouldn't be right without one!
One more to go...
I'd love to know which you prefer! Thanks for reading.
Until next time, craft in earnest! Craftin' Ernest x

Wednesday 13 May 2015

Time to Upcycle!

I've mentioned before that I'm a hoarder and as such I have some random things tucked away that I tell myself I'll get round to using at some point. 
Well that's just what I did at the weekend with the left-over bits of a clock I had previously removed the mechanism from.
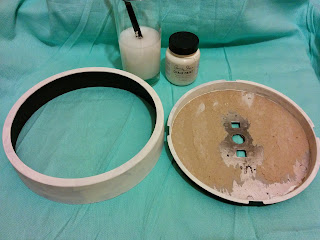
 I was basically left with a round, plastic frame with attached back and the front glass. It looked quite cheap (because it was) and was matt silver in colour but it was essentially a circular box frame.

I thought perhaps with a coat or two of paint it might look OK. Chalk paint has been all the rage for quite some time now and I thought, whilst I'm rather late jumping on the band-wagon, I'd give it a go. I bought a tester pot of Annie Sloan Chalk Paint in "Original" (a slightly off white) and was delighted that the label said it paints on plastic with no preparation needed, perfect!
I thought it was quite pricey at £6.50 for a 100ml pot but I did buy it from a little, independent furniture maker who gave me some helpful tips and also if there's no need for primer that's a saving both money-wise and time-wise, also it's apparently enough to do a small chair or side table. I was told to shake it very well and also to add a bit of water before giving it another good shake, so I did.
I gave both the outside frame and the edge around the clock face two good coats and was happy with the coverage. I really wasn't particular about it and after the first layer it was very uneven with areas of running paint where I put too much on, but after the second coat it looked good. I'm more than happy with it which is great as I have another two of them and there's enough paint to do many more than that.
For the inside of this one I decided upon an Summer's day outdoor scene.
I cut a circle of pale blue fabric and ironed it on to some heavy interfacing for support. 

I used various letter stamps to print out a phrase (I just made up) using ordinary stamping ink- Pigment Stampers Ink Pad in #14, a deep blue. This later seeped a bit into the fabric but as I was going for a whimsical, carefree, Summer-day feel I didn't think that was such a bad thing?!
I used "Heat n Bond" to attach green felt and fabric to give the look of hills. On the crest of the "nearest hill" I machined sewed numerous lines with an olive green thread to create the stalks.
I then hand sewed on small circles of red fabric (varying the size a bit) using black thread to make poppies, one of my very favourite flowers. 
I ironed a a small piece of "Heat n Bond" to the back of a piece of bee patterned fabric then carefully cut two of them out. Using my little Clover craft iron I bonded just the body of each to the sky background leaving the wings to stand proud.

I then attached it all the back of the frame using double-sided sticky tape. 
I think it can be improved as it was all a bit rushed but I'm happy enough with it. Now I have to decide on what goes in the other two but think I'll stick with the Summery theme.
I'd love to know your opinion! 

Until next time, craft in earnest! Craftin' Ernest x 

Monday 4 May 2015

Jam-Packed May Day Weekend

Who doesn't love a long weekend? I most certainly do and although the weather hasn't been the greatest, I've had a fantastic couple of days!
On Saturday my mum and I headed to Bristol on the bus for a day full of shopping and craft.
We went nice and early and had a quick wander round the shops before heading to Outlaw Craft Fair in The Passenger Shed, part of Bristol Temple Meads Railway Station.
We got to the fair just before 11 and had a workshop booked at 14:30 so we had plenty of time to explore. First thing first, we headed straight to the cake! It's important to keep your strength up after all ;-)

There were so many gorgeous stalls, they were packed full of wonderful treasures made by extremely talented crafters and artists, as well as others with goodies to craft with. Regular demonstrations were also taking place and there was a "make and take" theatre but unfortunately we missed out each time on those.
Boy did we shop though. We took money out at a cash machine on our way to the venue in a vain attempt to set a budget but it wasn't long before the card came out! It was all just so irresistible and when you're supporting local sellers, surely it would be rude not to?!?

Here's the majority of my stash! I bought a brooch too but that went straight on my coat and other cards but they went straight in the post.
I made 3 purchases in total from Boodle Boutique-  firstly a card and then a wooden badge. I did have my eye on a bumblebee print but couldn't think where I could put in the house so didn't buy it. Later I decided I would regret my decision when I got home and went back but they had gone! 
However, the super nice Bethan Buss of Boodle told me I could order one online and not pay P&P, great stuff... But she later came and found me at another stall as she had discovered she had another with her. I was delighted, such great service and so lucky as I had been in the workshop and only popped out for a moment- it was obviously meant to be.
Our lunch was delicious as well as nice and healthy, thanks to The Cornish Hen Delicatessen. My mum was very impressed with her homity pie and salad which she enjoyed whilst modeling a pair of silver earrings, she bought them as a retirement present from one of her sisters.
In this photograph she is picking them out, it took a while as everything in the display case was so gorgeous.
Our lampshade making workshop was great fun & we were both pleased with the finished items.
The day just flew by and we were shattered by the time we got home.


Sunday was spent at helping my former boss, Pete, at Tyntesfield House, a Victorian property owned by The National Trust. Each month they have a Food & Craft Market in the former stable area, now the ticket office, cafe and shop with a court yard. 
The market is a lovely mix of stalls ranging from bakers to stain glass window makers to natural remedy producers. 
Pete makes apple juice from a variety of different apples ranging from very sharp (Bramley) to very sweet (Egremont Russet) along with a pear juice made from Concorde pears. He also sells his own cider again made from his very own homegrown cider apples.
On top of the juices and cider is his honey- available both as runny or set, he currently has 3 hives and thinks blackberry blossom and other hedgerow flowers are they're main pollen source rather than the apple blossom in his orchard.
I made him a couple of aprons with his logo on a few of years ago, along with matching name badges. I was wearing the other one and they're still going strong I'm pleased to say.
Despite the very changeable weather we had a good day and Pete was pleased with the sales, even if we got a little wet making them. We also enjoyed some yummy produce from the stalls around us, brownies, tartlets and a scotch egg. Again we had to keep our strength up!
After such a busy Saturday and Sunday, it's lovely to have Monday off work to relax & get a few of the household jobs done (as well as admire my purchases).
Until next time, craft in earnest!
Craftin' Ernest x