I've mentioned before that I'm a hoarder and as such I have some random things tucked away that I tell myself I'll get round to using at some point.
Well that's just what I did at the weekend with the left-over bits of a clock I had previously removed the mechanism from.
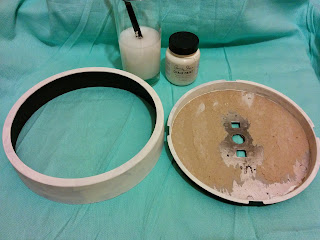
I was basically left with a round, plastic frame with attached back and the front glass. It looked quite cheap (because it was) and was matt silver in colour but it was essentially a circular box frame.
I thought perhaps with a coat or two of paint it might look OK. Chalk paint has been all the rage for quite some time now and I thought, whilst I'm rather late jumping on the band-wagon, I'd give it a go. I bought a tester pot of Annie Sloan Chalk Paint in "Original" (a slightly off white) and was delighted that the label said it paints on plastic with no preparation needed, perfect!
I thought it was quite pricey at £6.50 for a 100ml pot but I did buy it from a little, independent furniture maker who gave me some helpful tips and also if there's no need for primer that's a saving both money-wise and time-wise, also it's apparently enough to do a small chair or side table. I was told to shake it very well and also to add a bit of water before giving it another good shake, so I did.
I gave both the outside frame and the edge around the clock face two good coats and was happy with the coverage. I really wasn't particular about it and after the first layer it was very uneven with areas of running paint where I put too much on, but after the second coat it looked good. I'm more than happy with it which is great as I have another two of them and there's enough paint to do many more than that.
For the inside of this one I decided upon an Summer's day outdoor scene.
I cut a circle of pale blue fabric and ironed it on to some heavy interfacing for support.
I used various letter stamps to print out a phrase (I just made up) using ordinary stamping ink- Pigment Stampers Ink Pad in #14, a deep blue. This later seeped a bit into the fabric but as I was going for a whimsical, carefree, Summer-day feel I didn't think that was such a bad thing?!
I used "Heat n Bond" to attach green felt and fabric to give the look of hills. On the crest of the "nearest hill" I machined sewed numerous lines with an olive green thread to create the stalks.
I then hand sewed on small circles of red fabric (varying the size a bit) using black thread to make poppies, one of my very favourite flowers.
I ironed a a small piece of "Heat n Bond" to the back of a piece of bee patterned fabric then carefully cut two of them out. Using my little Clover craft iron I bonded just the body of each to the sky background leaving the wings to stand proud.
I then attached it all the back of the frame using double-sided sticky tape.
I think it can be improved as it was all a bit rushed but I'm happy enough with it. Now I have to decide on what goes in the other two but think I'll stick with the Summery theme.
I'd love to know your opinion!
Until next time, craft in earnest! Craftin' Ernest x


No comments:
Post a Comment