Showing posts with label Wrapping Paper. Show all posts

Tuesday, 7 April 2015

Storage Solution- Upcycled Box

Something my husband and I disagree upon quite regularly is how much stuff in the house is too much stuff? 
He strongly believes we passed the acceptable mark a long time ago and I've told him this is one of the downfalls of living with a "crafter"- to me there is no such thing as too much! 
OK I wouldn't like to end up on one of those reality TV shows where the council is sent in because you haven't thrown anything away for 20 years and can't move for old newspapers and dirty dishes with new lifeforms growing on them. 
But too much wool- not possible, overload of fabric- I don't think so, button boxes bursting at the seams- my idea of Heaven!
You just know the day you get rid of something is the day you find that's exactly what you need, that's a real frustration I do my best to avoid.

I will concede that this does make storage a bit of an issue and as such I do have a lot boxes, baskets, tins, pots, etc. 
I enjoy filling them with bits and bobs, forgetting where everything is and then rooting through them all making lots of discoveries, getting distracted and going off on a complete tangent.

I have boxes of all shapes and sizes, many of which people have kindly donated to me.
If I get a chance to decorate them before I fill them to the brim (this is rarely the case) so much the better.
My sister recently gave a box she had received as a gift from a friend at Christmas full of lovely Body Shop goodies.

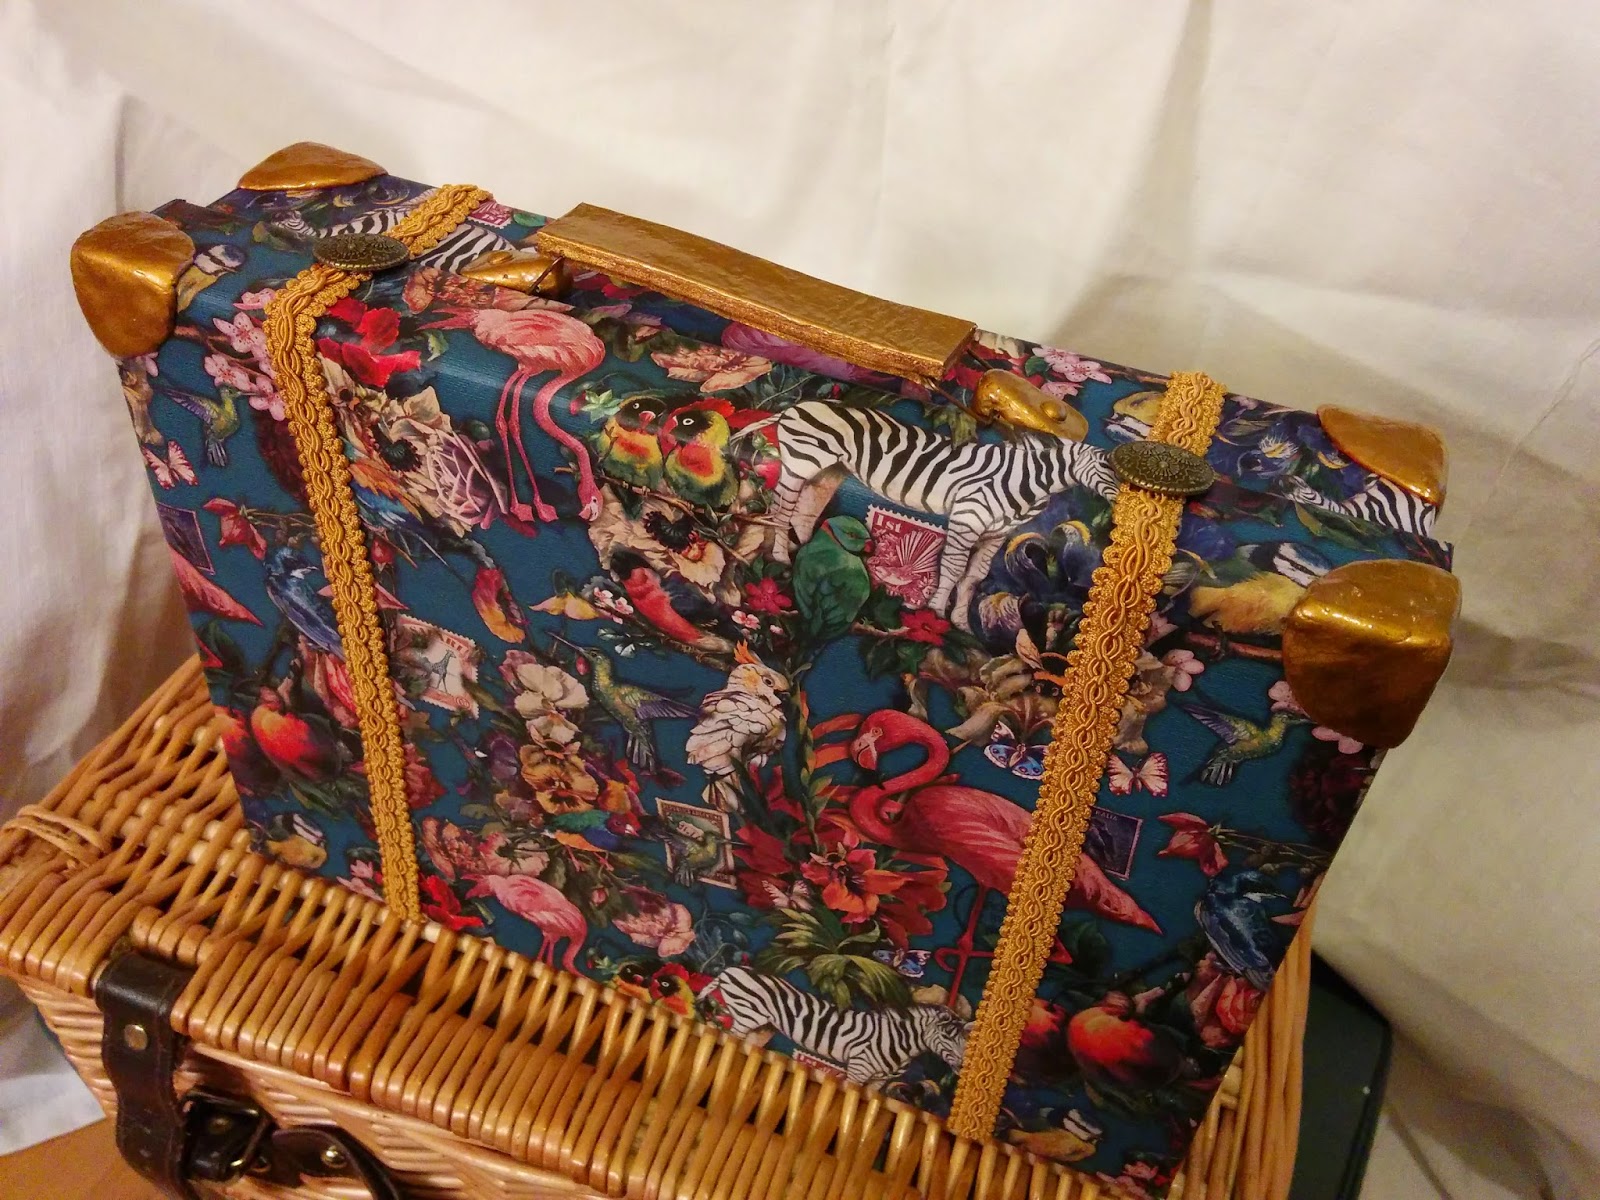
It was a nice sturdy box just right for a make over, so using some gorgeously ornate, eco-friendly wrapping paper from Wild & Wolf Ltd along with some Sugru, mouldable silicone glue, I transformed it into a vintage-style suitcase.

I cut one of the edges of the lid into a flap before covering the outside with the wrapping paper. I moulded the Sugru over the corners and used it to make attachments for the handle.
Once the Sugru parts had cured I painted them with gold coloured enamel paint. I made the handle using leather (also painted gold) and I attached it with wire rectangles made from hair pins. I added some decorative trim and flat metal beads as fake closures and the job was done.


Of course, now I have to find it a permanent home without upsetting the hubby....
I'd love to know what you think of the finished case and whether you believe there is such a thing as too much crafting stuff (although I'm going to stick with no)?

Until next time craft in earnest, Craftin' Ernest x

Monday, 13 October 2014

Wrapping Paper

I love wrapping presents, so much so I'd do it as a job if I could.
Having said that I can feel rather guilty about the frivolous nature of wrapping gifts with paper and the cost to the planet. I always try to unwrap things carefully so I can reuse the paper for something, be it to wrap something else or to make a card or line something, whatever it is it's good to reuse and is cost-effective too- a nice bonus! There are some really gorgeous papers out there that are such good quality they can be used over and over, especially if tied with ribbon instead of using sticky tape.

I'm always on the look out for for things to use as wrapping paper or to make gifts bags etc.
With this philosophy in mind I rescued some paper from work recently after the photocopier had a "software malfunction" and printed out a document as a series of lines similar to a barcode. Most had an overall green appearance due to the stripes being blue, yellow and black and some were just black and white.

I immediately thought the green tone paper would make great Christmas wrapping and the black and white could be easily jazzed up.

I made a gift bag using one sheet of the green, just the right size to pop a few small Christmas presents before finishing it off with a festive bow. I used a box of tea as the base structure (see below) and began wrapping as per normal at one end but without sticking anything down. I then drew a flap template at the other end which I cut out with scissors. I stuck the edge and the folded end together with double sided sticky tape and attached a strip along the edge of the flap, ready for sealing.

Using this wonderful origami tutorial from the delightful Gathering Beauty, I used two, green sheets to make a box. I finished it off with red and white striped washi tape along with a gift bow made with the same tape and plain paper off-cuts. It's just right for a Christmas present of jewellery. 

I used a pink and a yellow highlighter to spruce up a sheet of black and white, I thought this was "bang on trend" ;-) as neon is everywhere at the moment and would be good for my friend's birthday as she likes bright colours. It looks great with black ribbon
Making your own stamps as in this post is a great way to personalise plain paper into something a little more special and could even make newspaper a possible source?!
The other black and white sheet was calling out for haphazardly stamped, hot pink bumblebees and to be made into a gift bag.
I covered it with transparent, sticky vinyl then I used the same technique as the Christmas bag, although, this time, I stuck the edge and flaps down as I went.
I then folded the top 2cm down all the way around and cut 2 holes in both of the wide sides approximately 1cm down. I threaded a piece of ribbon (liberated from inside a cardigan) through each side to create handles and used a bead on each end before knotting for extra security. I also popped a rectangle of card in the bottom for a bit of extra strength.
When that's all done you're left with with a lovely little gift which is durable enough to be used over and over!

I hope you like the results? Thanks so much for visiting my blog.
Until next time- craft in earnest, Craftin' Ernest x